FRED Eco II

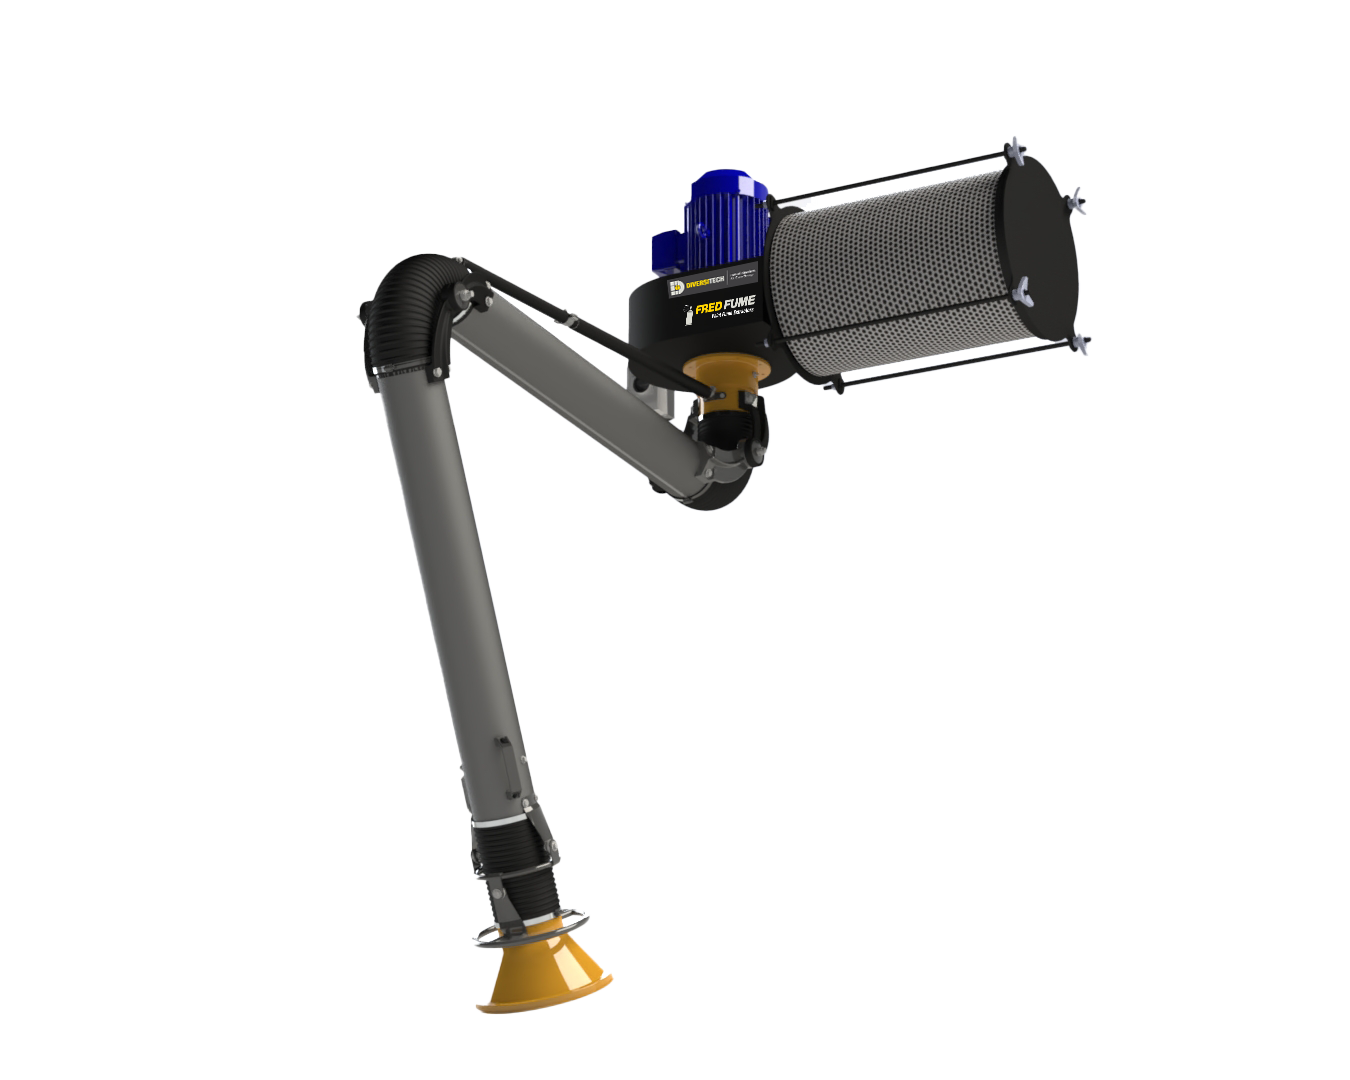
Designed for everyday applications, the FRED Eco II is a high-performing fume extraction & filtration kit. Featuring an externally articulated 10’ flexible capture arm that allows for simple repositioning and maintenance, the FRED Eco II is both easy-to-install and affordable. Smoke, dust, and other airborne contaminants are safely captured at source, reducing risk of exposure.

Equipped with a 120V rotary motor starter, the FRED Eco II can be conveniently mounted close to work areas. For applications where the extraction arm needs to be mounted further away from the blower, the remote mounting kit is a popular option.

The FRED Eco II’s high-efficiency 26” filter collects particles as small as 0.5 microns before returning clean air to back into the facility. By capturing, cleaning, and recycling contaminated air, the FRED Eco II works as a heat recovery device, helping to keep your energy costs down.

Recommended Applications

  • Ideal for welding.
  • Ideal for grinding.
  • Ideal for deburring.
  • Ideal for soldering.
  • Not ideal for sanding
  • Not ideal for painting

Overview

Designed for everyday applications, the FRED Eco II is a high-performing fume extraction & filtration kit. Featuring an externally articulated 10’ flexible capture arm that allows for simple repositioning and maintenance, the FRED Eco II is both easy-to-install and affordable. Smoke, dust, and other airborne contaminants are safely captured at source, reducing risk of exposure.

Equipped with a 120V rotary motor starter, the FRED Eco II can be conveniently mounted close to work areas. For applications where the extraction arm needs to be mounted further away from the blower, the remote mounting kit is a popular option.

The FRED Eco II’s high-efficiency 26” filter collects particles as small as 0.5 microns before returning clean air to back into the facility. By capturing, cleaning, and recycling contaminated air, the FRED Eco II works as a heat recovery device, helping to keep your energy costs down.

Benefits

  • Easy-to-install, easy-to-operate
  • Affordable, keeps energy costs down
  • Capture-at-source for cleaner air
  • Compliant with OSHA guidelines for controlling weld fumes

Features

  • Flexible 10’ x 6″ diameter externally articulated capture arm
  • 1.0 HP TEFC, 800 CFM Blower with a Pre-installed Wall-mount Bracket
  • 26” Re-useable Cartridge Filter (MERV 15)
  • Rotary starter with 15’ Power Cord

Options

  • Choice of flexible, externally articulated capture arm: 10’ or 13’
  • Automatic self-positioning, Fume Tracker™ capture arm
  • 1.5 HP 1200 CFM High-Static Motor [120V 1PH] or 3.0 HP 1800 CFM High-Static Motor [230/460/575V 3PH]
  • Extension Boom, 5’ or 10’
  • Spunbond Polyester Filter Cartridges (washable)
  • Hood mounted LED light kit

Models and Options

The FRED Eco II Wall-Mounted Fume Extractor base model comes equipped with a 120V, 1.0 HP motor and a 10’ externally articulated capture arm, but the following options are also available upon request:

10′ Capture Arm / 3.0 HP – 460V

Up to 1800 CFM
  • Capture Arm: 10′
  • Motor: 3.0 HP / 460V/3/60Hz
  • Product Number: ECO2-01-030N4

10′ Capture Arm / 3.0 HP – 575V

Up to 1800 CFM
  • Capture Arm: 10′
  • Motor: 3.0 HP / 575V/3/60Hz
  • Product Number: ECO2-01-030N5

13′ Capture Arm / 1.5 HP – 120V

Up to 1200 CFM
  • Capture Arm: 13′
  • Motor: 1.5 HP / 120V/1/60Hz
  • Product Number: ECO2-01-13-015N1

13′ Capture Arm / 3.0 HP – 230V

Up to 1800 CFM
  • Capture Arm: 13′
  • Motor: 3.0 HP / 230V/3/60Hz
  • Product Number: ECO2-01-13-030N2

13′ Capture Arm / 3.0 HP – 460V

Up to 1800 CFM
  • Capture Arm: 13′
  • Motor: 3.0 HP / 460V/3/60Hz
  • Product Number: ECO2-01-13-030N4

13′ Capture Arm / 3.0 HP – 575V

Up to 1800 CFM
  • Capture Arm: 13′
  • Motor: 3.0 HP / 575V/3/60Hz
  • Product Number: ECO2-01-13-030N5

10′ Capture Arm / 5.0 HP – 230V

Up to 2500 CFM
  • Capture Arm: 10′
  • Motor: 5.0 HP / 230V/3/60Hz
  • Product Number: ECO2-02-050N2

10′ Capture Arm / 5.0 HP – 460V

Up to 2500 CFM
  • Capture Arm: 10′
  • Motor: 5.0 HP / 460V/3/60Hz
  • Product Number: ECO2-02-050N4

10′ Capture Arm / 5.0 HP – 575V

Up to 2500 CFM
  • Capture Arm: 10′
  • Motor: 5.0 HP / 575V/3/60Hz
  • Product Number: ECO2-02-050N5

13′ Capture Arm / 5.0 HP – 230V

Up to 2500 CFM
  • Capture Arm: 13′
  • Motor: 5.0 HP / 230V/3/60Hz
  • Product Number: ECO2-02-13-050N2

13′ Capture Arm / 5.0 HP – 460V

Up to 2500 CFM
  • Capture Arm: 13′
  • Motor: 5.0 HP / 460V/3/60Hz
  • Product Number: ECO2-02-13-050N4

13′ Capture Arm / 5.0 HP – 575V

Up to 2500 CFM
  • Capture Arm: 13′
  • Motor: 5.0 HP / 575V/3/60Hz
  • Product Number: ECO2-02-13-050N5

Technical Specifications

Model (Product Number) Motor (H.P.) Air Flow (CFM) Volts/Phase/Hz Amps Net Weight1 Width1 Height1 Length1 Cord Length (ft.) Arm Length (ft.) Arm Diameter Filter Type
ECO2-01-010N1 1.5 1200 120V/1/60Hz 13.2 72.57 51″ 35″ 27″ 15 ft. 10′ 6″ MERV 15
ECO2-01-030N2 3.0 1800 230V/3/60Hz 7.1 72.57 51″ 35″ 27″ N/A 10′ 6″ MERV 15
ECO2-01-030N4 3.0 1800 460V/3/60Hz 3.7 72.57 51″ 35″ 27″ N/A 10′ 6″ MERV 15
ECO2-01-030N5 3.0 1800 575V/3/60Hz 3.2 72.57 51″ 35″ 27″ N/A 10′ 6″ MERV 15
ECO2-01-13-015N1 1.5 1200 120V/1/60Hz 13.2 74.84 51″ 35″ 27″ 15 ft. 13′ 6″ MERV 15
ECO2-01-13-030N2 3.0 1800 230V/3/60Hz 7.1 74.84 51″ 35″ 27″ N/A 13′ 6″ MERV 15
ECO2-01-13-030N4 3.0 1800 460V/3/60Hz 3.7 74.84 51″ 35″ 27″ N/A 13′ 6″ MERV 15
ECO2-01-13-030N5 3.0 1800 575V/3/60Hz 3.2 74.84 51″ 35″ 27″ N/A 13′ 6″ MERV 15
ECO2-02-050N2 5.0 2500 230V/3/60Hz 12 72.57 51″ 35″ 27″ N/A 10′ 6″ MERV 15
ECO2-02-050N4 5.0 2500 460V/3/60Hz 6 72.57 51″ 35″ 27″ N/A 10′ 6″ MERV 15
ECO2-02-050N5 5.0 2500 575V/3/60Hz 4.6 72.57 51″ 35″ 27″ N/A 10′ 6″ MERV 15
ECO2-02-13-050N2 5.0 2500 230V/3/60Hz 12 74.84 51″ 35″ 27″ N/A 13′ 6″ MERV 15
ECO2-02-13-050N4 5.0 2500 460V/3/60Hz 6 74.84 51″ 35″ 27″ N/A 13′ 6″ MERV 15
ECO2-02-13-050N5 5.0 2500 575V/3/60Hz 4.6 74.84 51″ 35″ 27″ N/A 13′ 6″ MERV 15

1 – Product weight and dimensions are based on base-models and may vary depending on selected product features. Please contact us for an accurate shipping quote.

Learn how to get the most out of your FRED Eco II Wall-Mounted Fume Extractor and troubleshoot common problems.
See our help topics and support videos below, and download the FRED Eco II product guide and owner’s manual.

How to..

+ Set up your FRED Eco II for the first time


Unpack Unit

  1. Inspect carton for any possible damage during transit.
  2. Use forklifts or truck to move.
  3. Remove packing material.
  4. Do not tip or invert while handling.
  5. You’ll find the item serial number, model and electrical ratings located on the nameplate. Write down information on the provided Maintenance Record found in the owner’s manual.

Installation

Tools required:

  1. 7/16 Socket or Wrench.
  2. 9/16 Socket or Wrench.
  3. Torque Wrench.

Arm-to-Blower Direct Installation

  1. Choose a location:
    • Designate a location for the unit near the operator that is sufficiently close to a grounded power source.
    • Choose an attachment point (column, platform, or wall) that will support the weight and force of the equipment.
    • Ensure sufficient minimum clearance to the right of the unit.
  2. Attach capture arm to swivel base:
    • Mount Swivel Base to Motor Blower Assembly.
    • Tighten all Bolts (8) with Washers (8).
    • Torque each bolt to 23 N m
  3. Attach J-Bracket to Arm Swivel:
    • Mount J-Bracket to Swivel Base.
    • Tighten all Bolts (8) with Washers (8) and Nuts (3).
    • Torque each bolt to 34 N m
  4. Blower to Attachment Point:
    • Motor Blower Assembly (1).
    • Attachment Point Anchors (Not Included).
  5. Attach Filter to Blower Assembly:
    • Place Filter in final location.
    • Install the Connecting Rods, ensuring the Filter is not damaged during installation.
    • Tighten left Knobs to hold Connecting Rods.
    • Install Right Filter Bracket.
    • Tighten right Knobs to Lock Filter.
  6. Attach Capture Arm to Swivel Base. (J-Bracket).
  7. Attach Filter to Blower Assembly:
    • Thread Bolts (3) with Washers (3) through Mounting Bracket and J-Bracket.
    • Thread Washers (3) and Locking Nuts (3) to Bolts (3).
    • Tighten all Bolts (3) to Locking Nuts (3).
    • Torque each bolt to 40 N m.
  8. Install Flex Hose:
    • Mount Flex Hose to Swivel Base and capture Arm.
    • Tighten Both Hose Clamps.

Arm-to-Wall Direct Installation

  1. Choose a location:
    • Designate a location for the unit near the operator that is sufficiently close to a grounded power source.
    • Choose an attachment point (column, platform, or wall) that will support the weight and force of the equipment.
    • Ensure sufficient minimum clearance to the right of the unit.
  2. Attach capture arm to swivel base:
    • Mount Swivel Base to Motor Blower Assembly.
    • Tighten all Bolts (8) with Washers (8).
    • Torque each bolt to 23 N m.
  3. Blower to Attachment Point:
    • Motor Blower Assembly (1)
    • Attachment Point Anchors (Not Included).
  4. Attach Filter to Blower Assembly:
    • Place Filter in final location.
    • Install the Connecting Rods, ensuring the Filter is not damaged during installation.
    • Tighten left Knobs to hold Connecting Rods.
    • Install Right Filter Bracket.
    • Tighten right Knobs to Lock Filter.
  5. Mount Bracket in Suitable Location Relative to FRED-ECO.
  6. Attach capture arm to swivel base:
    • Mount Flex Hose to Swivel Base and Capture Arm.
    • Tighten Both Hose Clamps.
  7. Attach capture arm to swivel base:
    • Mount Swivel Base to Remote Mount Bracket.
    • Tighten all Bolts (8) with Washers (8).
    • Torque each bolt to 23 N m.
  8. Attach J-Bracket to Arm Swivel:
    • Mount J-Bracket to Swivel Base.
    • Tighten all Bolts (3) with Washers (6) and Nuts (3).
    • Torque each bolt to 34 N m.
  9. Attach Capture Arm to Swivel Base. (J-Bracket):
    • Insert J-Bracket between Capture Arm Mounting Bracket.
    • Thread Bolts (3) with Washers (3) through Mounting Bracket and J-Bracket.
    • Thread Washers (3) and Locking Nuts (3) to Bolts (3).
    • Tighten all Bolts (3) to Locking Nuts (3).
  10. Install Flex Hose:
    • Mount Flex Hose to Swivel Base and capture Arm.
    • Tighten Both Hose Clamps.
+ Perform Function Test


Before you use your unit, you’ll want to perform a function test to verify it’s in working order.

  1. Confirm correct Voltage and Amperes.
  2. Turn the power switch to “On”.
  3. Look to confirm that the unit is level and stable. Verify nothing is obstructing extraction path.
  4. Listen closely to the motor and suction sound of the unit. Are they within the expected noise limits?
  5. Place hand on top of the unit and feel for any unexpected vibration. Place your hand in front of the intake surface to confirm the expected levels of suction.
+ Service Filter
  1. Turn off power and disconnect input power cord.
  2. Support the filter bracket while unbolting the knobs from the connecting rods.
  3. Remove the filter bracket.
  4. Remove the connecting rods to ensure the filter is not damaged during removal.
  5. Remove filter gently and place in a bag/container.
  6. Clean filter:
    • Use clean/dry air only at a pressure not more than 550 kPa at 30 cm from media.
    • Direct the compressed air through the filter from the clean side, running the nozzle up and down the filter pleats.
    • Do not bring the nozzle in contact with the filter media to avoid damage.
  7. Inspect filter for any damage and replace if necessary.
  8. If necessary, clean filter brackets of dirt and debris.
  9. Reassemble:
    • Install the clean filter.
    • Install the connecting rods, ensuring the filter is not damaged during installation.
    • Install the filter bracket.
    • Install the Knobs on the connecting rods with sufficient tightness.
    • Place Filter in final location.
    • Install the Connecting Rods, ensuring the Filter is not damaged during installation.
    • Tighten left Knobs to hold Connecting Rods.
    • Install Right Filter Bracket.
    • Tighten right Knobs to Lock Filter.

Troubleshooting

+ The motor does not operate on your FRED Eco II unit
  1. Check leads at input power source.
  2. Check leads at unit.
  3. If the problem continues, contact Diversitech support for assistance.
+ Restricted airflow
  1. Check Hood inlet and Capture tubes. Clean if needed.
  2. Check filters. Replace if necessary.
  3. If the problem continues, contact Diversitech support for assistance.
+ The motor on unit operates intermittently
  1. Contact Diversitech support for assistance.

Guides

No data available.

Videos

A Closer Look at FRED Eco II

Get an in-depth look at FRED Eco II and explore its key features in action.
This video showcases how it works, its standout benefits, and why it’s the perfect choice for you. Watch now and experience the innovation firsthand!

Slides

Swipe Through the Details of FRED Eco II

Get an in-depth look at FRED Eco II and explore its key features in action. This video showcases how it works, its standout benefits, and why it’s the perfect choice for you. Watch now and experience the innovation firsthand!

Related Products

Request A Quote

Please provide the information requested below so we can provide you with a timely and customized solution for your specific needs.